“Shades of Blue & Grey” A Painters Eye View Part 1
I’m a relative newbie to all things ACW. I only really started painting figures in Blue and Grey in the last two years and as for gaming the period, I have only taken part in two demo games, both at Colours ’06 using “Honor & Glory” rules by Dave Marks. On his new website Scott Mingus gave me the honour of calling me “one of the more talented painters of miniature Civil War Figures” he had come across, praise indeed coming from him. Well, it’s been quite a journey from picking up my first ACW figure to achieving this title and this and the following articles will I hope lead you along that journey, with information on uniform resources, useful websites, painting tips and the odd photo thrown in for good measure. So where did this journey start? I painted the odd figure whilst serving in the Army, more as a way of passing the time than anything. I had a go a most things but after reading my first “Sharpe” book, my interest turned to the Napoleonic period. The descriptions of the uniforms grabbed my interest and I soon found my self collecting various books and other reference material, the research was as enjoyable as the painting. Over time I built up quite a collection of painted figures, these included a few units but mostly they were in the form Command stands with flags, covering both Infantry and Cavalry units. Well my family grew and my hobby space got smaller, so I put my figures on line and sold the lot, including the majority of my books. Looking for something to fill my time I turned to reading the “Starbuck” novels, this lead to biographies on Lee, Jackson and Grant. I managed to find a company that produced some nice 28mm figures of these personalities along with others (Dixon’s) and dug out my paints, and that’s how it all started. 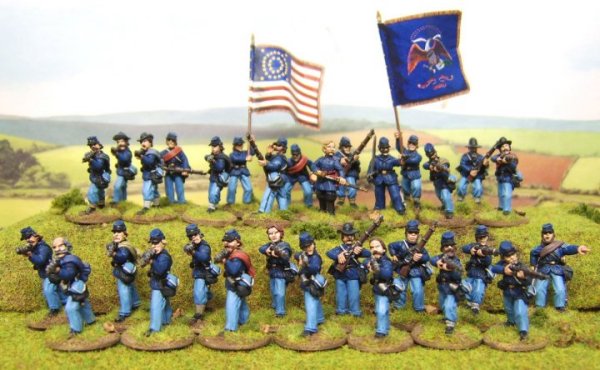
What I did not realise at that time was just how engrossing the whole period would become, not just the research and painting, but reading about those who were involved on both sides of the conflict through their diary entries and letters home to collecting the songs and the music they would have heard (Bobby Horton is playing in the background as I type this).
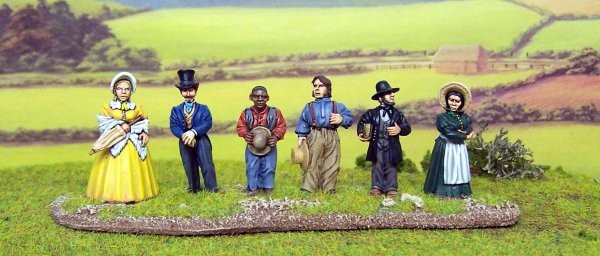
The other thing that occurred to me was that although the Armies were often referred to as the “Blue & the Grey” that statement was far from the truth, though not as colourful as the armies of the Napoleonic period, there were a vast number of differing uniforms styles in a wide range of shades and colours. So that’s really what these articles will be about hence the title “Shades of Blue & Grey”. How many times have you placed your units on the table top only to have a voice from behind say something along the lines of “hey that’s the wrong colour jacket”, “their knapsacks should be black” or “they would not have had that”? I have always tried to paint my figures as correct as possible, but due to sculpting differences between manufactures it is sometimes hard to find just the right figures for the unit you are putting together. I use Redoubt figures due to the number of poses, uniform types and head variants available, but you may find that you prefer another maker, the choice is yours. 
Now what about painting them correctly? Just where is the best source of material for uniform details?
There are so many books on uniforms that it would take a whole edition just to cover them, but we all have our favourites, the ones we reach for when in doubt. What about other sources though? How about the Internet or Re enactment groups or museums and private collections? I have found in the last two years that it does not matter how well you do your research there is always someone who will find fault if they so wish. I put together some Dixon figures painted up as Berdan’s Sharpshooters in campaign clothing. You know the type of thing, the unit had been in action for the last couple of months, no new supplies from the rear, lost and damaged kit has been replaced with what ever was at hand. I received from a visitor to my site a positive comment on my painting skills, but then was told that “this was wrong” and “that was wrong” and “where did I get my information from?” 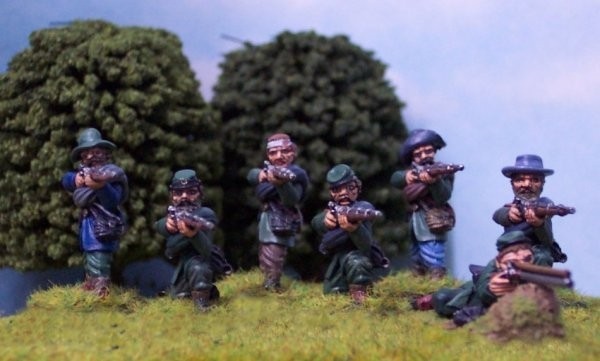
In fact I had used a series of photos I had found on the Berdan's Sharpshooters own Re-enactment site as a painting guide. So was I so wrong with my painting? The comments made were fair and were later used to paint up some of Redoubt’s Sharpshooters, the difference being these latter figures were kitted out in what would be deemed as their full issue uniform right down to their special issue cooking equipment and rucksacks where as the original set had been done to represent a unit that had seen combat and not just walked off the parade square.
Re enactors can provide a wealth of information on uniforms and equipment worn by their specific unit and when used in conjunction with the art work of Don Troiani, Mort Kunstler and books such as “Uniforms of the Civil War” by Smith and Field, plus the various publications available by Osprey Publishing to name but a few, you can achieve something that not only looks good but is also as near to historically correct as can be.
I hope you have enjoyed reading this painter’s views on the hobby and that some of my comments will spark future debate as to sourcing of uniform information and painting guides. Next: I will look at a specific unit and what information is available, draw up a painting guide and choose and prepare the figures and flags needed to produce a 6 man command stand. “Shades of Blue & Grey” A Painters Eye View Part 2
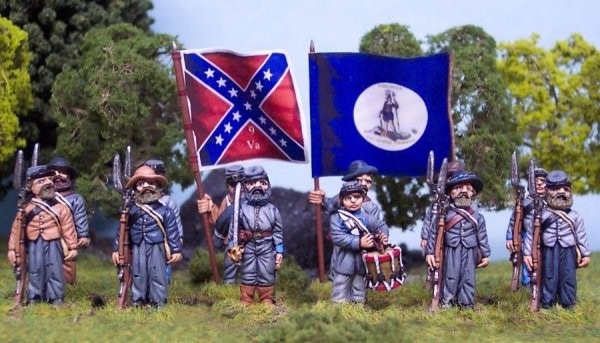
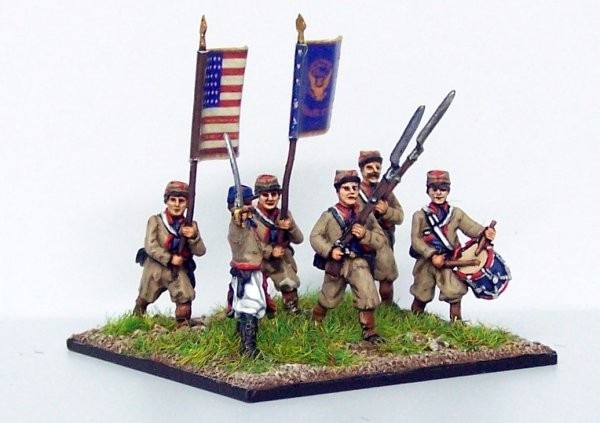
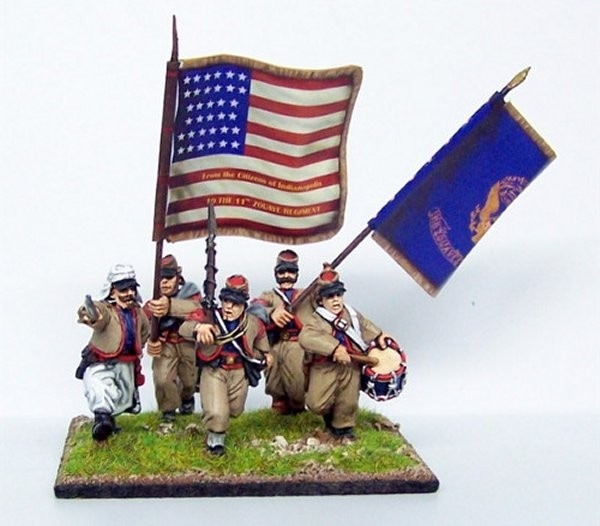
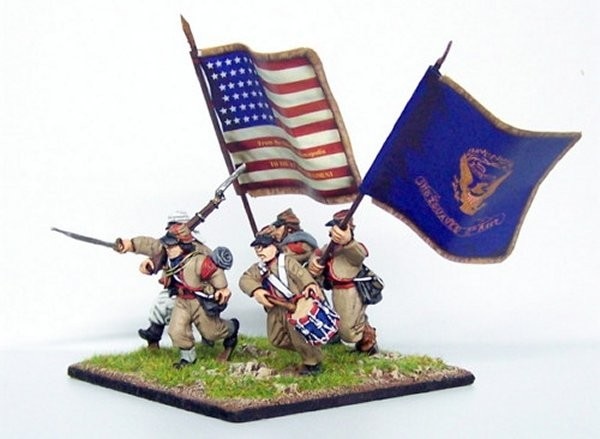
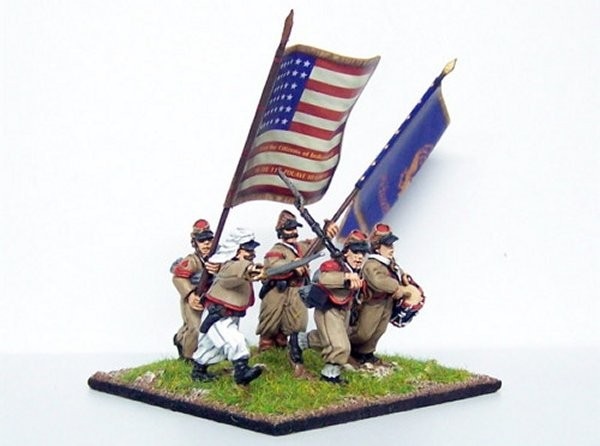
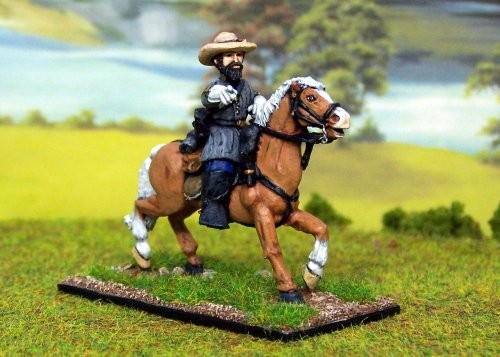
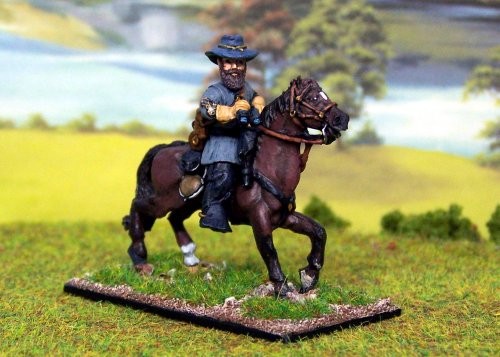
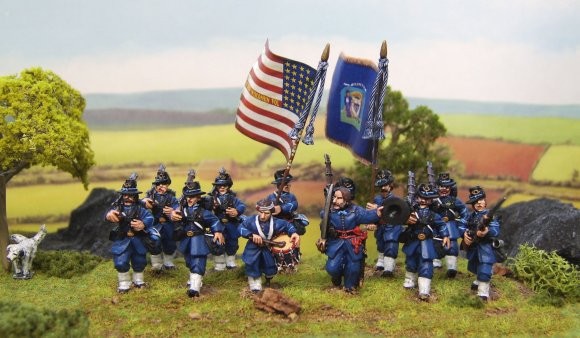
Welcome back, for this the second part of “Shades of Blue & Grey”. I will start this article by firstly giving a brief history of the Unit I have chosen and then from the uniform details available draw up a painting guide. In Part 3, I will cover the painting and basing of the figures. Although I normally paint 28mm scale ACW figures, I will also be painting up a 15mm set to illustrate that you can have an accurate representation of a unit in that scale also. I have chosen to use for my 28mm figures, Redoubt Enterprises, pack ACW110, Western Theatre Zouave Command, the uniforms and equipment on these figures will allow for me to give the figures a campaign look. For my 15mm figures, AB Miniatures, Pack ACE-24 Infantry Command, Zouaves in Kepi, which comprises of 2 each of ACW 30, 93 & 94, these will be painted in full uniform. With Redoubt’s separate head system I will be able to use a head with a Havelock to depict Col. Wallace himself, as he is often shown wearing this type of headgear. For flags I will be using Body’s Banners (Redoubt Enterprises) flag sheets ACU 38 (28mm) and 15 ACU 5 for the 15mm. 11th Indiana Volunteer Zouaves The 11th Indiana Zouaves was raised on the 25th April 1861 in Indianapolis and was one of the first 6 Regiments (6th – 11th, the first five numbers being left in memory of 1st -5th Regiments that served in the Mexican War) which enlisted for an initial period of three months service, the 11th later went on to re-enlist for three years on 31st August 1861 and later for a final 18 months ending it’s service on 26th July 1865. 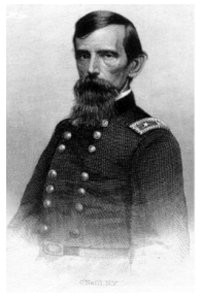
The Regiment was first commanded by Col. Lewis (Lew) Wallace (1827-1905), and it was his name that the Regiment would forever be associated with, “Wallace’s Zouaves”. At the outbreak of hostilities he was appointed the Adjutant General for the State of Indiana, a position though he only held for ten days resigning to take up the post of Col. of the 11th.
Col. Wallace had a distinguished career during the war raising to the rank of Major General at the age of 34, the youngest officer to make that rank, though he is better known today as the author of the classic novel “Ben Hur”. The 11th served with distinction in both the Western and Easter Theatres of operations and among their Battle Honours are Shiloh, Antietam, Gettysburg, and the Wilderness. During the war the 11th Indiana wore two distinctive Zouave style uniforms, the first and the one which the unit is better know for (and I am going to paint) was designed by Col. Wallace himself and was worn until the end of ’61. The second uniform is not so well know and there are only a few period descriptions available, but these speak of a very dark blue Zouave Jacket edged in sky blue piping, with a distinctive drooping flower tombeaux design on the chest also in light blue, dark blue vest with standard issue blue kersey trousers often seen to be tucked into tan gaiters. The unit when first established was issued with a grey jean (light Brown) forage cap that had a top panel of red, these were later replaced by a standard issue blue forage cap as they become damaged or lost. Picture examples of this second uniform can be seen in “American Civil War Zouaves” by Osprey Publishing, Officers and Soldiers of the American Civil War” by Histoire & Collection and in photos on the 11th Indiana’s Re-enactors site, which portray the unit in this second issue uniform. 
Now back to the first issue uniform. From the outset the 11th wished to be known as a Zouave unit and Col. Wallace himself devised a unique Zouave drill not unlike that of Ellsworth’s Zouave Cadets to be used as a recruiting tool. Though unlike Ellsworth’s Zouaves they did not wear the gaudy uniform usually associated with Zouaves.
Col. Wallace, a devout Christian saw these uniforms as a being to much like the Moslem clothing as worn by the French Algerian Zouaves and so set about designing his own intending them to have “nothing of the flashy, Algerian colours”. He describes their uniform as: “Our outfit was of the tamest twilled goods, not unlike home made jeans – visor cap, French pattern, it’s top of red cloth; a blue flannel shirt with open neck; a jacket Greekish in form, edged with narrow binding, the red scarcely noticeable; breeches baggy, but not petticoated; button gaiters connecting below the knees with the breeches, and strapped over the shoes.” -Lew Wallace, An Autobiography (New York: Harper, 1906) From this description we can ascertain that unlike some modern images of the unit the basic colour for the trousers and jacket was a pale brown and not the grey commonly used, due to jean cloth at this period being pale brown in colour. An example of what I mean can be seen in Don Troiani’s “Regiments of the Civil War”, where he depicts a soldier from the 11th Indiana in the pale brown jean cloth described. Using both the pictorial and written evidence available I have come up with the following painting guide. For paints, I use Foundry’s three colour system. Officer: Headgear 28mm White Havelock (Arctic Grey 33) 15mm Forage Cap (Deep Blue 20, Scarlet 38) Zouave Jacket Main Jacket (Rawhide 11), Piping (Scarlet 38) Vest (Deep Blue 20) Trousers (Arctic Grey 33) Sash (Scarlet 38) Boots (Charcoal Black 34) Leathers (Charcoal Black 34) Buttons-Fittings (Brazen 36) Other Ranks: Headgear Forage Cap (Rawhide 11), Centrepiece (Scarlet 38), Peak (Charcoal Black 34) Zouave Jacket Main Jacket (Rawhide 11), Piping (Scarlet 38) Vest (Deep Blue 20) Trousers (Rawhide 11) Gaiters (Tan 14) Sash - Stripes SNCO/NCO (Scarlet 38) Shoes (Charcoal Black 34) Socks (Artic Grey 33) Leathers (Charcoal Black 34) Buttons-Fittings (Brazen 36) Water Bottles Covers (Drab 12), Strap (Artic Grey 33) Haversack (Charcoal Black 34) Rifle Wood (Bay 42), Barrel and Fittings (Armour 35 with ink wash) Blankets (Slate Grey 32) Book Sources: Haythornthwaite, .P, Uniforms of the American Civil War, Blandford Press, Poole, 1975. Smith, R., Field, R., Uniforms Of the Civil War, The Lyons Press, Guilford, 2001. Smith, R., Younghusband, B., American Civil War Zouaves, Osprey Military Books, London, 1996. Jouineau, A., Mongin, J., Officers and Soldiers of the American Civil War, Histoire & Collections, Paris, 2001. Troiani, D., Don Troiani’s Civil War Zouaves, Chasseurs, Special Branches & Officers, Stackpole Books, Mechanicsburgh, 2006. |
“Shades of Blue & Grey” A Painters Eye View Part 3
I have given a lot of thought on how to write this section, as it was supposed to be a “how to paint” guide. But most of you already paint your figures and as I have said before I’m not a professional, so in a way I think it would be a bit of a cheek to do so. What I have decided to do instead is give you a couple of suggestions and let the photos do the rest. To start with after cleaning up the figures with a modelling knife and the occasional file, I use a small amount of super glue gel and fix the figure to a pop bottle lid and undercoat in black using a short haired brush, this allows you to work the paint into small areas. Also I have found that if a figure requires a staff or a pike it is better to attach it at this point with a good adhesive (EVO-STIK Serious Glue). 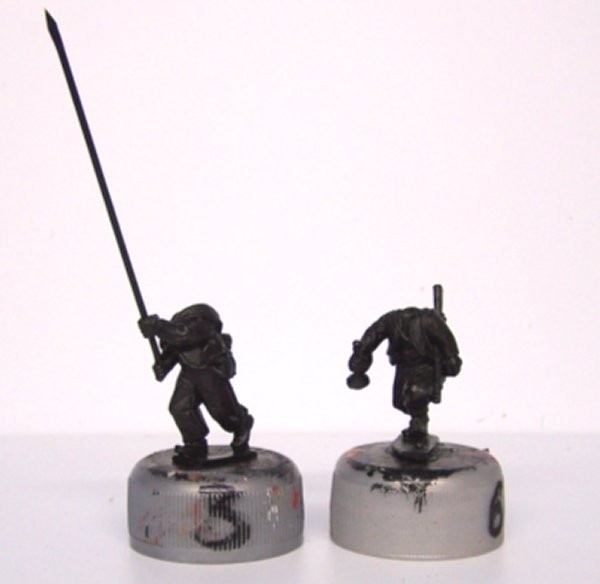
Next I do the faces. Unless you are doing 20mm or above, a simple base colour, wash and highlight works fine (this is also fine for the larger scales if you are wanting a basic war gaming effect), but because most of my work is for collectors or gamers who want their figures to look the apart, I paint real faces.
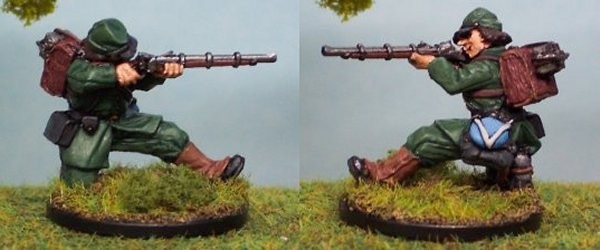
Here’s Redoubt’s John Reynolds figure as an example: 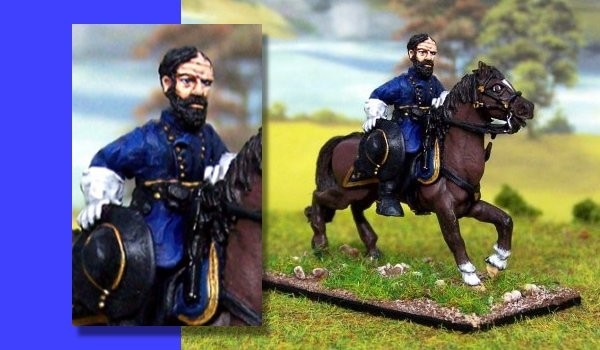
Most figures come with their head already attached, but with Redoubt’s separate head design I have found a great way of painting them without firstly gluing them in place, a benefit of this is if you have a quiet period you can paint up a load of heads ready for when you need them.
I went to a local electrical shop and bought a bag of small crocodile clips which I then attach to the neck shaft of the head, this allows you to hold the head and due to the size of the clip not get cramp in your fingers. With the Redoubt set I numbered each figure and head and ensured a clean fit before undercoating in black. 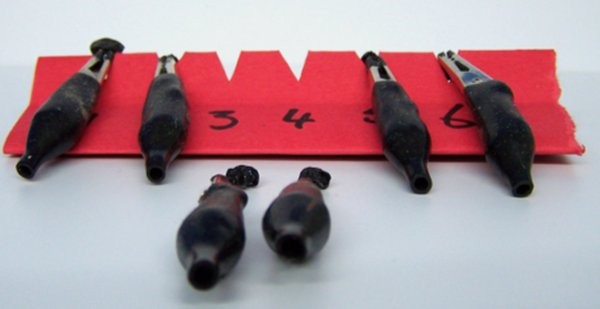
I start by doing the eyes, use a pale blue (23C) paint (if painting figures with a dark skin use a pale brown (56C) instead of a blue) and paint in a line within the eye socket going across the eye, don’t worry about it being perfect at this point.
Using a dark blue (20A) or brown (42A), now paint in the iris; once this is done, tidy up around the edge of the eye with your black. Now onto the face, using Foundry’s base flesh colour and then give the whole area a wash with GW flesh ink. After allowing the face to dry for about 5 minutes I then use the next flesh colour and go over the washed area, stopping just before the hair line, ears, mouth, edge of the nose, creases in the forehead and eye sockets. Finally I use the highlight colour, slightly watered down (I’ve a damp sponge on hand to run the brush over to achieve this) and go over the raised areas. After the face has dried I work on the hair, this is simply done using an appropriate colour from my paints, painting on the base colour and the main but dry brushing the highlight. Uniforms and equipment are painted more or less the same way as the faces but I leave out the wash and because most of mine end up in people’s cabinets I only use minimal black lining. Well I think that’s enough of that; here are the finished figures AB’s 15mm first followed by Redoubt’s 28mm. 


|