The aim of this project is to produce a Tarzan 'army' to use in my Crossfire games. To this end everything will be arranged and based to fit in with Crossfire rules.
Tarzan and his allies make for an interesting and varied army with plenty of scope for strangeness. This project will involve painting figures (of course), making a couple of buildings/structures and coming up with some rules so that the flavour of the setting and characters comes through in a tabletop game. Each of these facets will be covered in varying degrees of depth as I progress. First, the miniatures: 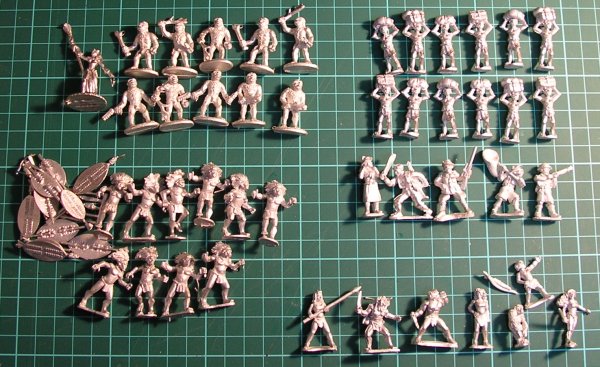
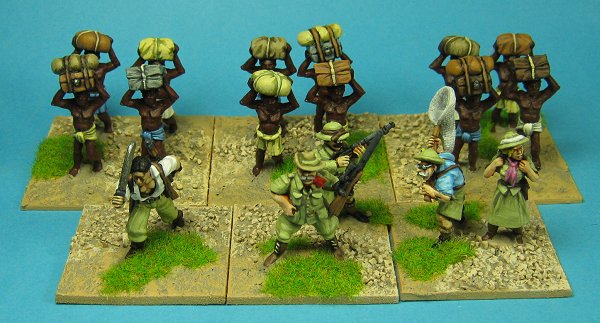
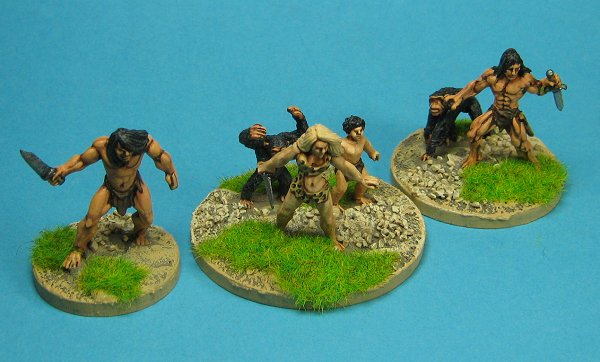
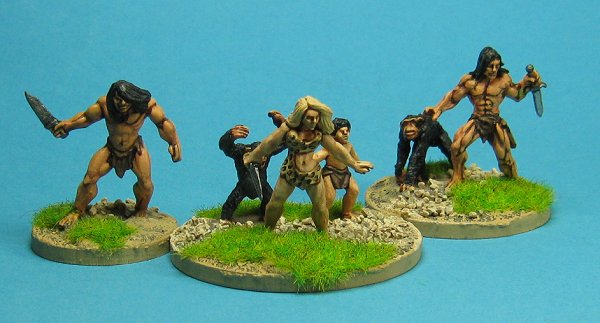
Here is the human contingent of the army. Bottom right we have the main, named characters; Tarzan, Korak, Jane and a few others notably Boy and Cheetah which are from the films/TV series rather than the books and therefore not cannon as far as I'm concerned. However, the figures are available so why not? These figures are from Foundry and Pulp Figures.
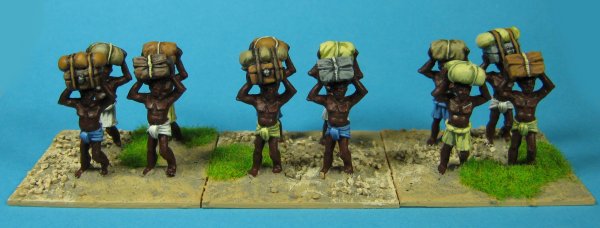
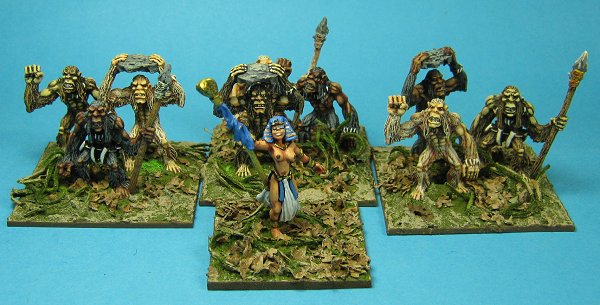
Above the main characters is the Safari. The white folk are from Pulp Figures again and the bearers are from Dixon Miniatures, lovely little chaps at a fraction of the cost of Foundry bearers. For the sake of completeness I am on the look out for some cheap Foundry bearers off E-bay or somewhere but I have all I need for a single safari group and any further will be extras. Bottom left are the Waziri who will be led by Jane. These are Copplestone Castings figures. Above them are the beast men of Opar led by La, their priestess. La is a Reaper Miniature and the beast men are from The Honourable Lead Boiler Suit Company. I also have some Romans of the lost legion ordered from Black Tree Design but they haven't arrived yet. I may, of course, add more groups later as ideas occur to me. 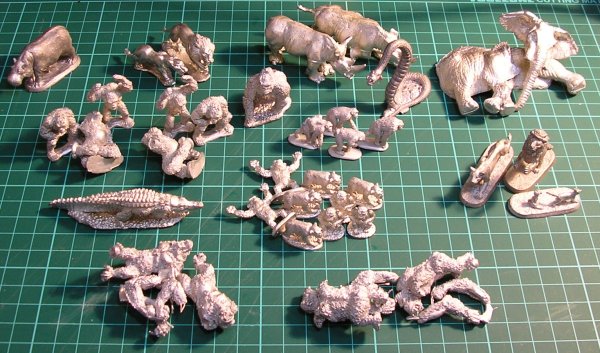
The beasts of Tarzan are next. Here are the ones I've assembled so far, again, as with the humans, others may be added.
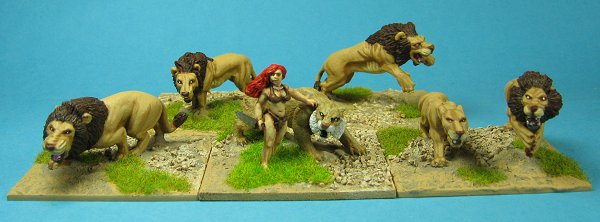
Top right is Tantor the elephant from Steve Barber. Like many elephant models out there his legs are in the wrong stride pattern for an elephant which I personally find annoying and, under normal circumstances, he wouldn't have been considered. But, he has such character, that I decided he was the elephant for me despite this. I bought the large crocodile and a pair of lions from Steve Barber also. The lions (top left) are going to be Jad-bal-ja the golden lion and his mate. There is another family of lions beneath Tantor from Ral Partha. Also from Ral Partha is the hippopotamus. The snake is from Rafm. The rhinos are from Copplestone Castings. The apes make up a large contingent of course. Foremost amongst these are four great apes from Obelisk Miniatures (bottom of picture), these will form a group led by Tarzan himself. Korak will lead the slightly smaller great apes from Pulp Figures which are near the hippo. Next to these is a Foundry gorilla and two sets of chimpanzees, one from Mega Miniatures and one from Eureka. Change of plan: I've decided to use these figures for the Beast men of Opar but unfortunately they seem to be out of production. I believe they are Ral Partha figures, if you have some you're willing to let me have for a small amount of cash I would be very grateful. (I've found some on e-Bay thanks to the helpful folks at The Lead Adventure Forum.) 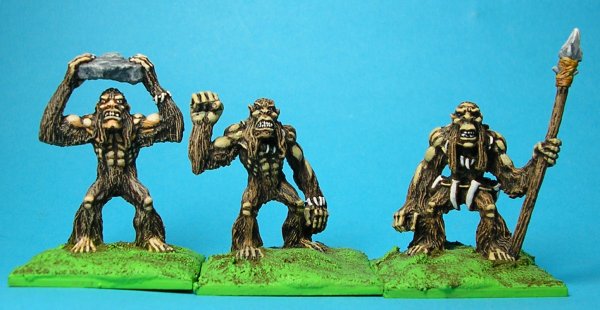
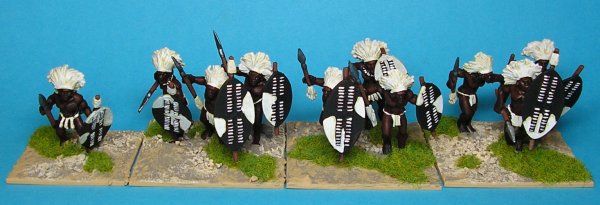
The Waziri, figures from Copplestone Castings.
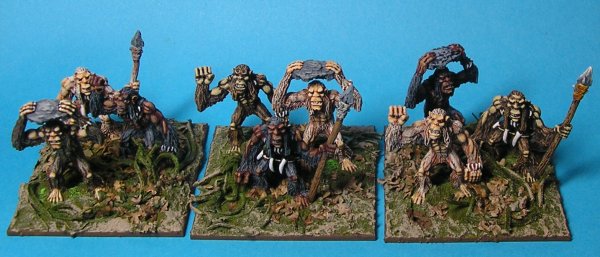
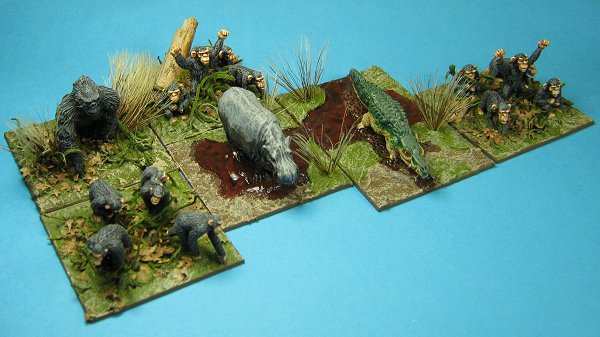
The beast Men of Opar, Taers from Ral Partha.
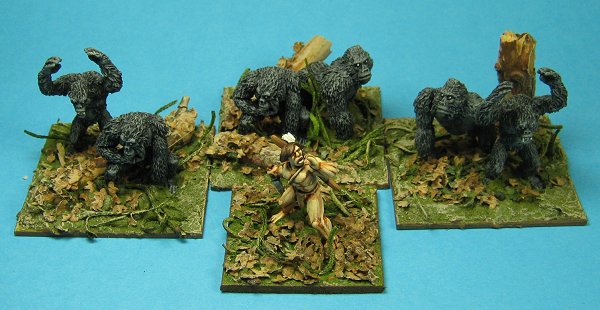
A unit of Great Apes that will be led by Korak. These are from Pulp Figures.
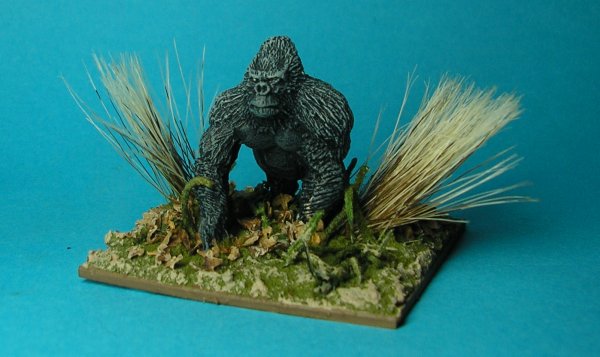
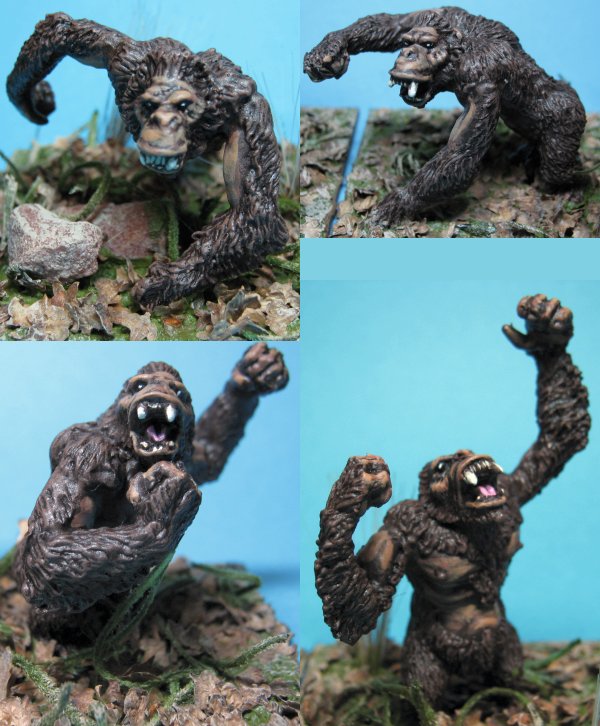
The first of Tarzan's 'beasts', a Foundry gorilla.
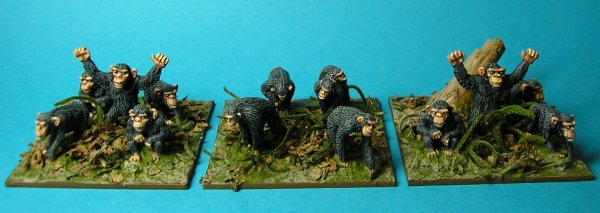
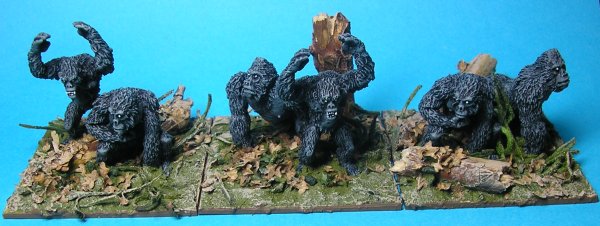
More beasts, chimpanzees from Mega Miniatures and Eureka.
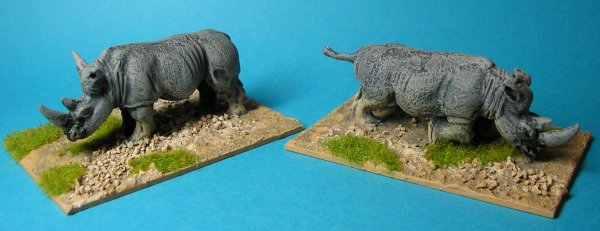
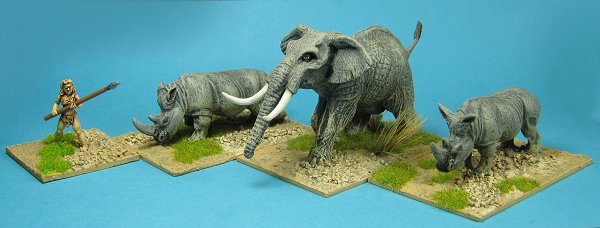
Rhinos from Copplestone Castings.
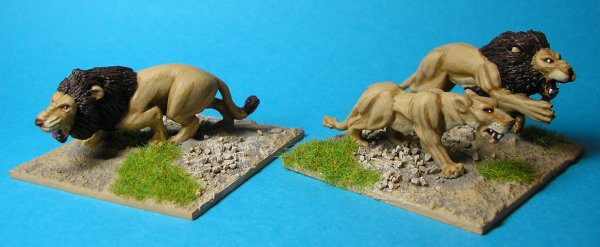
Lions from Foundry and Steve Barber. I haven't decided which one's going to be Jad-bal-ja yet, probably the Foundry one.
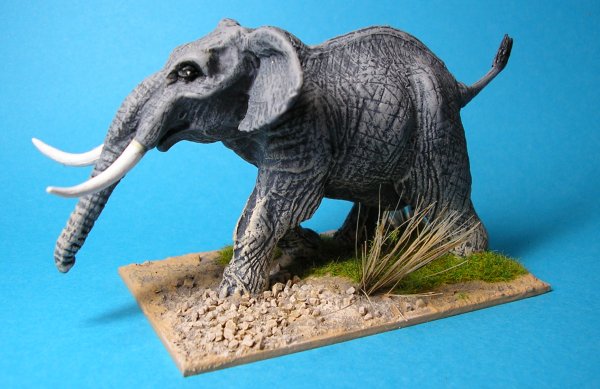
Tantor from Steve Barber.
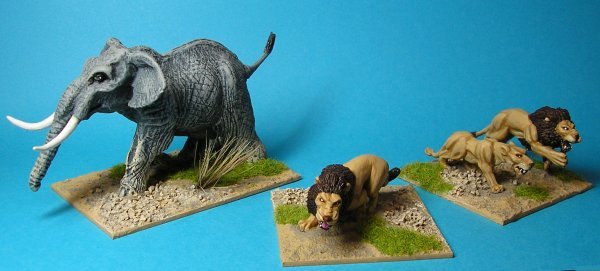
Tantor and the lions to give an idea of sizes.
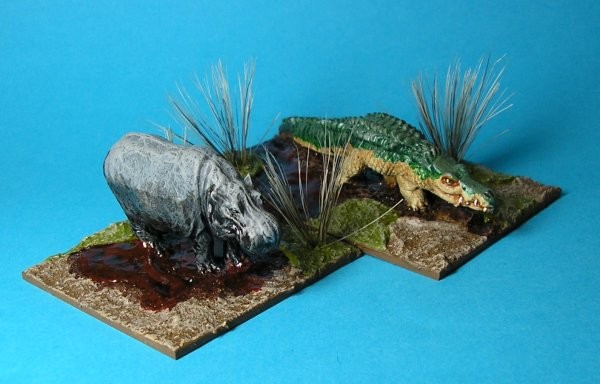
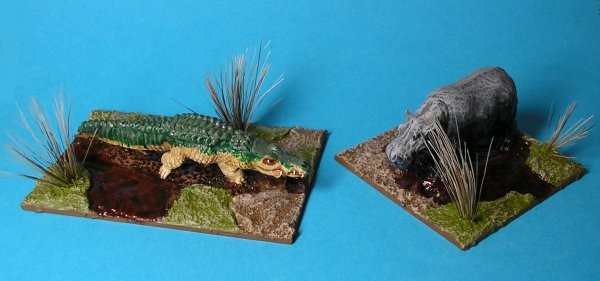
Danger lurks at the water's edge too, a hippopotamus from Ral Partha and a crocodile from Steve Barber.
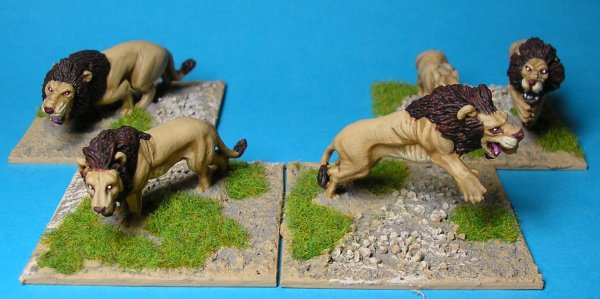
The last of the lions, two more from Foundry.
Here are the Great Apes that will be led by Tarzan himself. Lovely miniatures from Obelisk Miniatures. 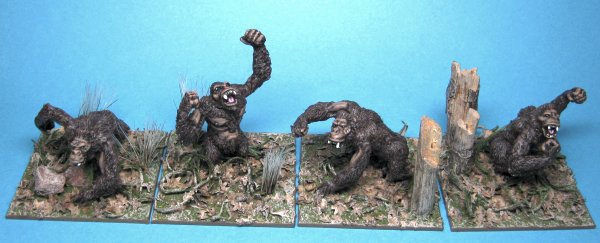
I've started on the Safari group. Here are the Dixon bearers, a decent (and much cheaper) alternative to the Foundry packs.
The Army
Here are the finished units. I finally managed to complete the personality figures three years late thanks to the 2011 Lead Painters League and its special African bonus round. Tarzan himself and his great apes. 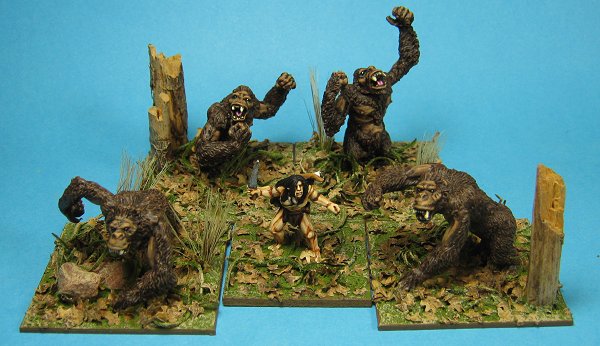
Korak, the son of Tarzan and his great apes.
Jane (with Boy and Cheetah, a nod to the films) protected by a unit of Waziri.

The Beasts of Tarzan.These are for forested and river areas.
These are for grasslands. They can be fielded with this fighting version of Jane as a unit if necessary. Tantor is particularly fearsome in close combat.
The lions are also for grassland areas, again they can be a separate unit led by Sheena if needed.
In the deep jungle lies the lost city of Opar. Its queen, La, sometimes leads her bestial male followers to aid Tarzan.
Finally, the safari. Sometimes in need of rescue, sometimes bringing death and danger to the animals Tarzan is sworn to protect.
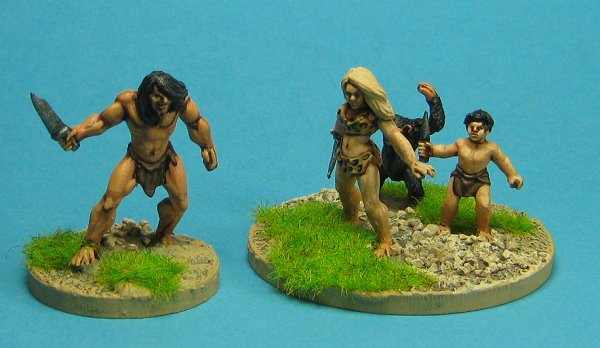
Because it would be wrong to exclude the Jungle Lord from my other game settings I bought a new set of Tarzan and family from Northstar and a Reaper figure as well. I mounted the Tarzan's on 30mm (for CROM) and 40mm (for modern games) circular bases and grouped the family on a 50mm so they can be used for almost everything.


|
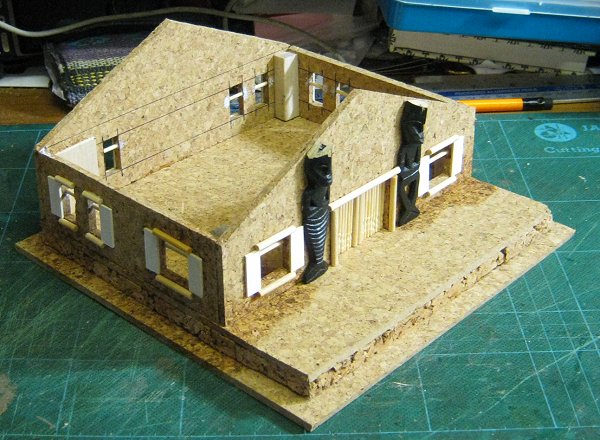
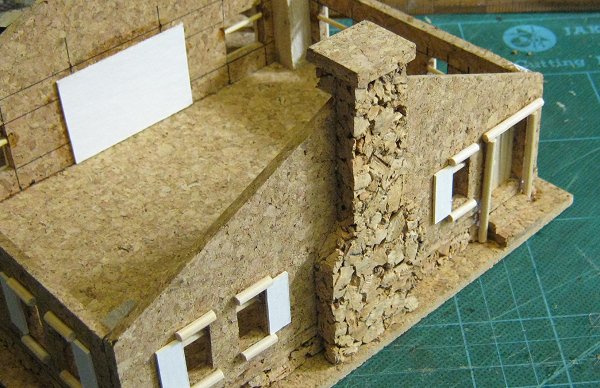
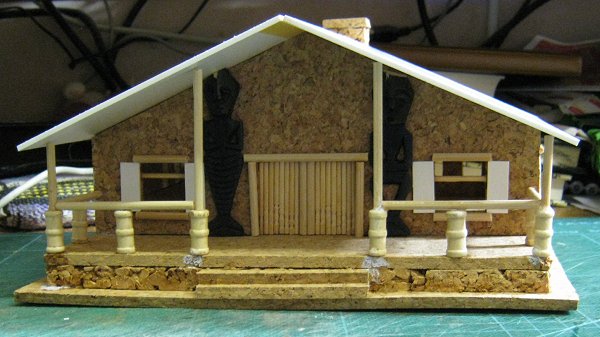
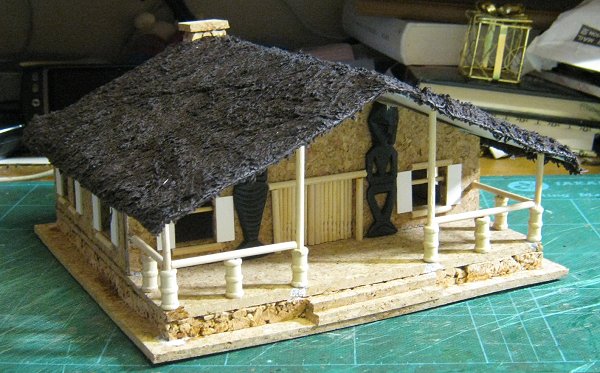
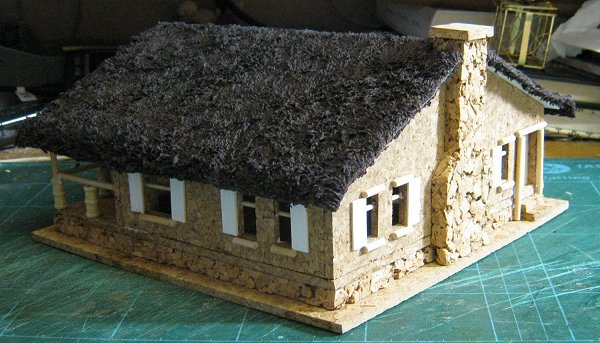
Well, the house of Lord Greystoke in Africa to be more precise. This is a plantation house where Jane can live in comfort, guarded by faithful Waziri warriors, as she oversees the farming interests of her husband while he's away gallivanting around the jungle.
As always it's made with 4mm corkboard and a few odds and ends of balsa wood, card and bamboo skewers (available at all supermarkets from the barbecue aisle). Here's the cutting plan for the walls and floor. 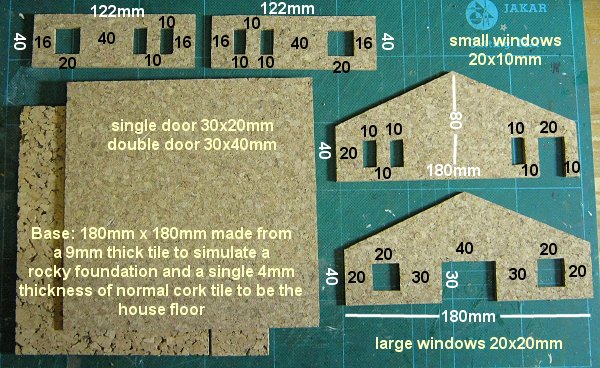
Once the walls are cut it's a good idea to cut all the window frames etc in one go before the gluing starts. I use a 'Chopper' to cut mine, it's a very useful bit of kit which I got from Antenociti's Workshop.
As you may have noticed I have some cocktail sticks with nicely turned ends. This adds some interest but isn't necessary, normal plain cocktail sticks will do fine. 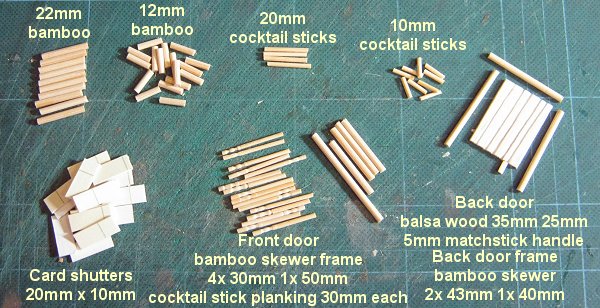
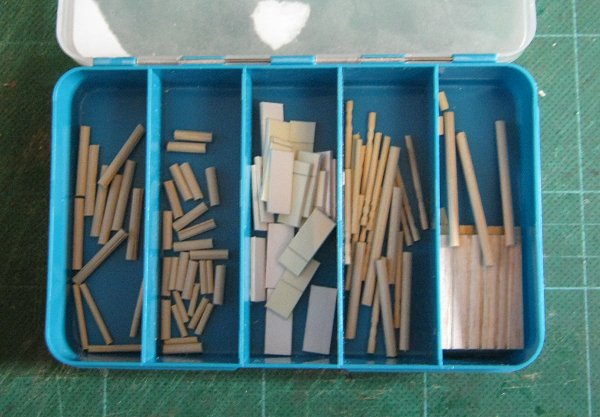
Once everything's cut I like to make sure they don't get mixed up or worse, dropped on the floor, so I keep some handy compartmentalised boxes around.
The last bit of preparation work is to glue the two parts of the floor together. I've used two pieces of 9mm cork tile here from my off cuts box rather than a single bigger piece. Since only the edge will be visible in the finished building you could get away with four strips and a hollow centre but, cork is cheap, and this way the floor is supported all over.
I used PVA to stick the thick cork to the normal cork tile (it's underneath) and clamped everything while it dried. A heavy book on top works just as well. 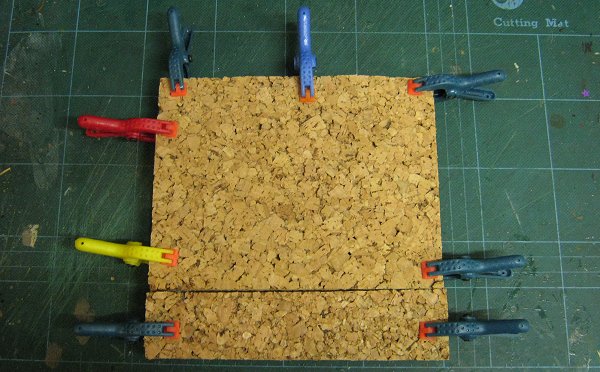
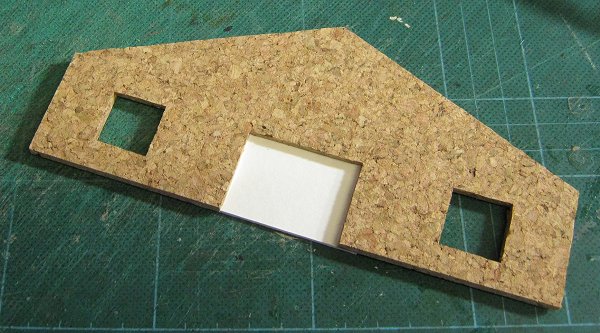
With all the prep work done it's on to the gluing. I started with the main door. I cut a rectangle of card and stuck it behind the opening with PVA. This will support the cocktail sticks that actually make up the doors. Once it was stuck I covered the visible part with more PVA.
I laid on the cocktail sticks and two pieces of bamboo skewer to form the doors. The skewer sections form the vertical edges where the two sliding doors meet and double as elegant handles (the doors don't move, but feel free to make your own opening versions).
The frame was also glued in place with PVA, this allows time to get everything in position before it dries. 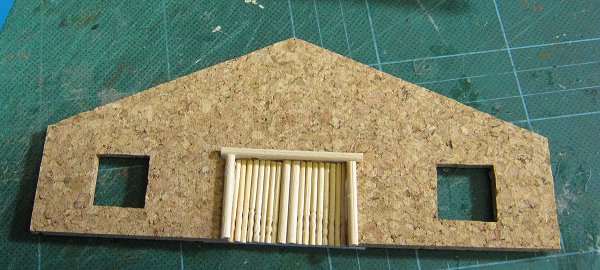
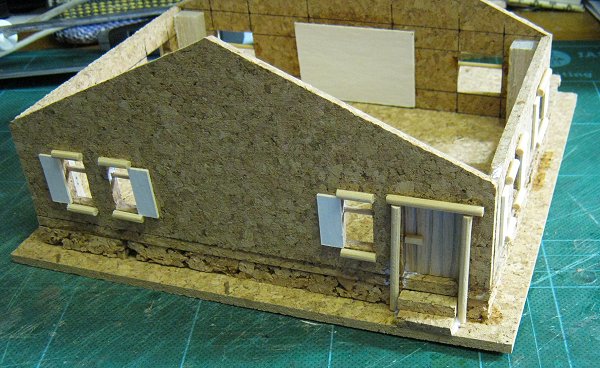
Next I did the windows. It's actually a little easier to do the windows first but I was impatient to see if the door worked out as I'd intended so I ignored my own hard earned experience.
First I inserted the 20mm cocktail stick sections into the window apertures. They should be a tight fit and ideally hold themselves in position without the need for glue. I pushed them in so they were flush with the back edge of the opening. If you haven't already done the door you can just lay the wall on a flat surface and this part is a lot less fiddly. Once they were in position I added small drops of superglue from the inside side of the wall to fix them permanently. Next I glued the card shutters in place with more PVA. Once they are in position they act as placement guides for the window sills which are also glued with PVA. 
The final touch for the front wall was the addition of a pair of African pendants that I've had for years. I bought them originally from a market stall for another project.
I sawed the tops of their heads off to match the slant of the roof and stuck them down either side of the door. These aren't necessary of course, if you have something suitable then all well and good, if not, a painted African design would be nice or just leaving the wall plain is acceptable, the gaps aren't really big enough to look like they need filling with something. 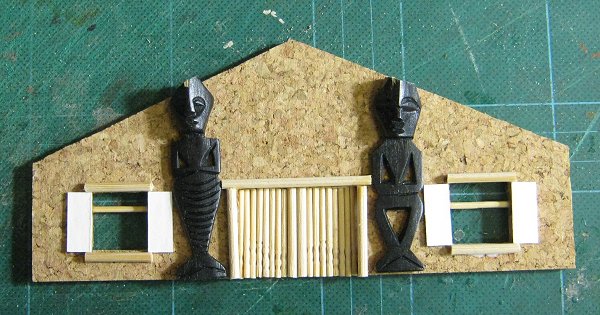
After the front wall was complete it was just a matter of going round and doing the same for the other three.
I've just noticed the measurement for the top of the back door frame is wrong in the cutting instructions; it should be 25mm not 40mm, you'll have to clip a little off. 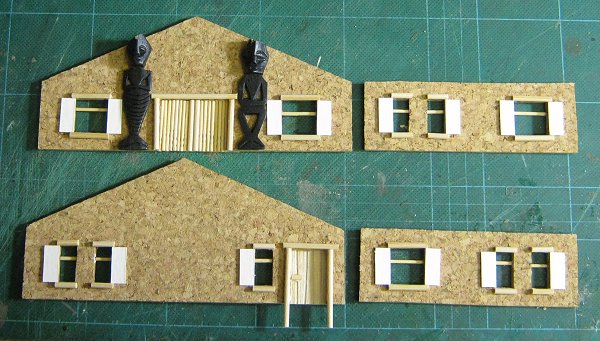
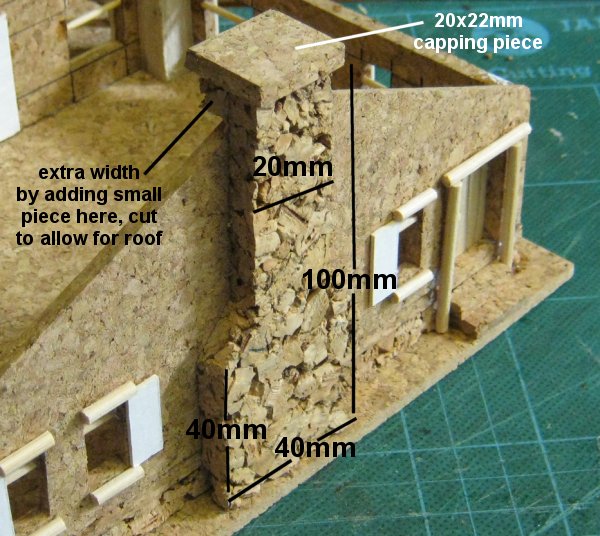
Before I could assemble the building I had to add one more layer to the base. This is the actual base of the model and is 200mm x 200mm. You can leave it off but it provides support for the steps and protection for the thick cork which can be a little crumbly.

I added three 40mm balsa wood blocks in the corners to help during assembly, these are glued to the side walls prior to joining them to the front and back walls. If you want to add a support to the corner by the back door it will need to be very thin, I didn't bother.
Everything was stuck together with super glue and some accelerator. I started with the back wall as the door frame makes it the easiest to position and built everything off that. 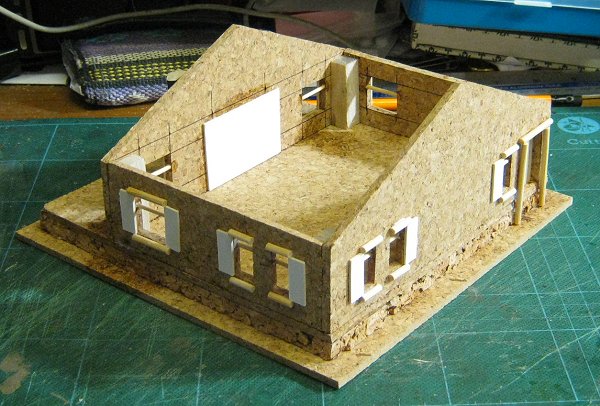
Next I added some steps. these were simply made with two strips of cork, one 10mm wide and one 5mm wide. The rear steps were cut to 20mm.
And the front steps were cut to 60mm.
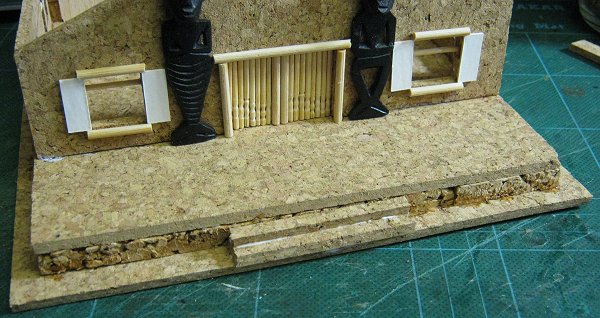
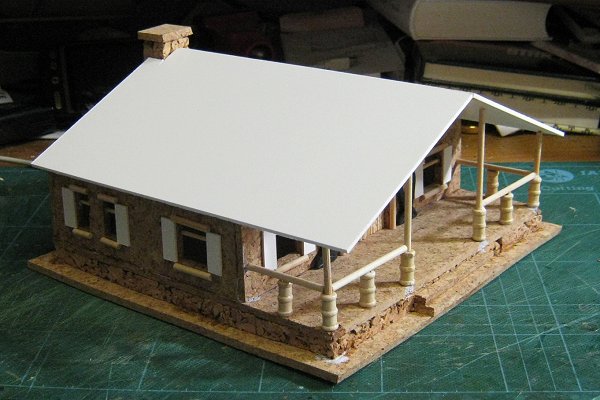
The veranda railings are made with what I had to hand. There are any number of ways to make something similar and I'm sure you're more than capable of figuring something out. The important parts are the upright posts which will be supporting the front of the roof.
I used some wooden beads that I bought off Ebay years ago and four bamboo skewers. I pushed the skewers into some beads as far as they would go and then glued them in place. 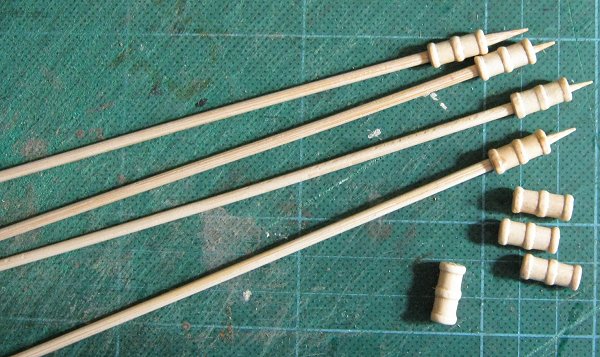
Once they were dry enough not to slip around during the subsequent measuring and cutting I set to work on the tricky part.
The height of the posts needed to be measured from the base of the bead, the end nearest the skewer point. Two were to be corner posts and so were cut to 40mm to match the height of the side walls and the other two were to go either side of the front steps and they needed to be what ever the height of the front wall was at those positions. I measured as best as I could and found it was 66mm. To be on the safe side I cut them 67mm. 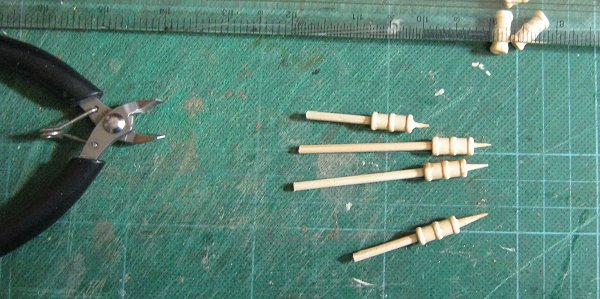
It's a little clearer once you see them in their final positions.
I used a pin vice to drill pilot holes for the skewers and glued them in place. I added more beads by eye to complete the uprights for the railing and fixed them with PVA. 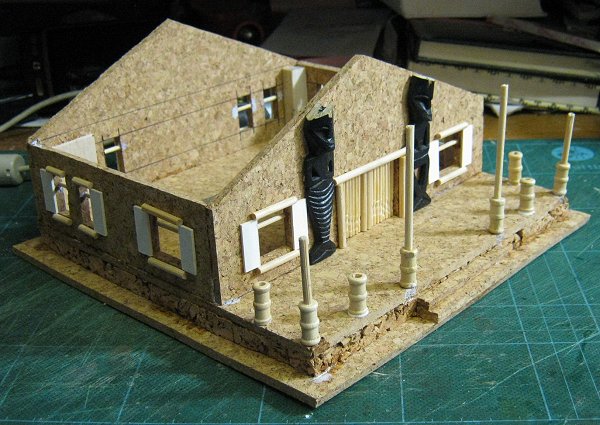
Lastly I cut more lengths of bamboo for the horizontal parts and used superglue and accelerator to fix everything firmly.
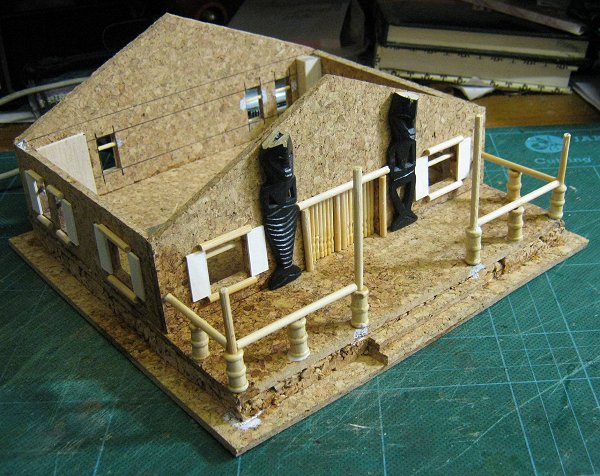
The finishing touch before the roof was the chimney. I cut a basic shape from 9mm cork tile and added a small piece at the top so it had more of a correct thicknessabove the roof level. I topped the chimney with a 20mm x 22mm piece of normal cork. I'm going to add the chimney hole with paint but you can always cut a real hole in this top piece if you prefer.
The roof is very basic. I used foamed PVC or Sintra as it's known. Card would be fine but I've been meaning to try Sintra for a while and this roof is due to see quite a lot of PVA and water before it's finished so I went for the non-absorbant option. It'll be just my luck to find it repells PVA, oh well, nothing ventured...
Plasticard would be an option as well of course. I cut two rectangles, 105mm x 195mm and joined them with a strip of masking tape on the underside. I cut out a hole for the chimney as well. You need to offer up the roof to the chimney and mark it out that way, premeasuring doesn't work. 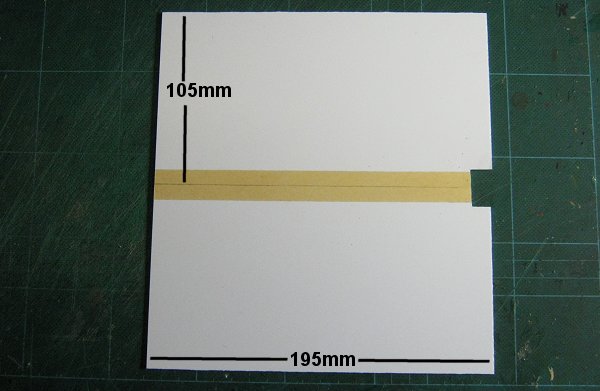
The roof sits in place quite happily. I might need to make internal bracers for it later to ensure it retains its shape but we'll see.
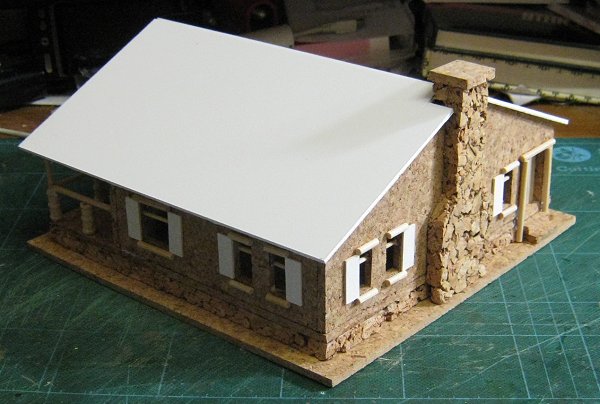
I was planning on doing something different with the roof and trying out a new idea but I can't find the materials I bought for it (I got them three and a half years ago when I first planned this) so I'm going to stick with thatching for the time being.
I use towel for my thatching so the first step is to cut out a suitable sized piece. I used a brown towel to avoid having to paint it a dark colour later, painting towel takes forever and you never cover all of it. I cut out a generous amount allowing a lot of overlap all the way around. 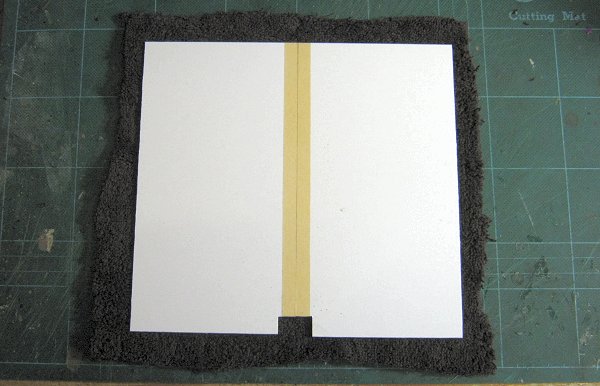
Next I dissolved some PVA in a small amount of hot water and put the towel in to soak.
While it was soaking I applied neat PVA evenly to the top side of the roof making sure I went right to the edges. 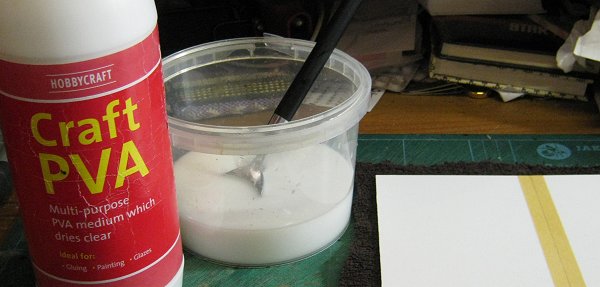
I wrung out the soaked towel and got it into position then put the roof back on the house so it will retain a slope to match the walls. It had to sit a little forward to clear the chimney but it should still be fine.
I propped the building on a large paint pot to keep it clear of the newspaper underneath it so it didn't stick as it dried and then ladled a fair amount of the PVA and water mix over the roof to soak it again. Now it needs to dry overnight, possibly for longer, and then the painting can begin. 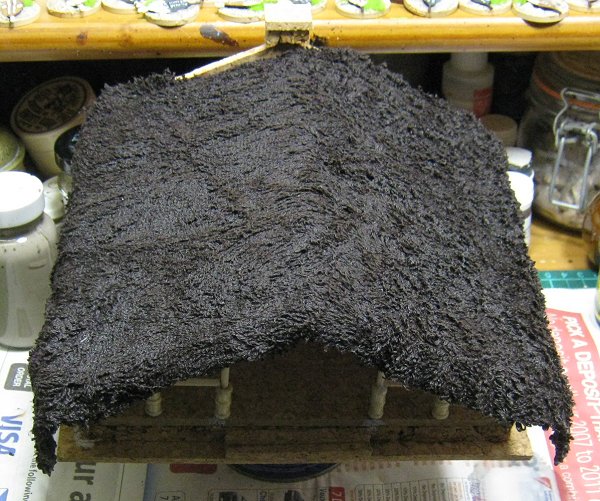
It took 48 hours for the roof to dry, here it is trimmed to size. The next stage is the painting.
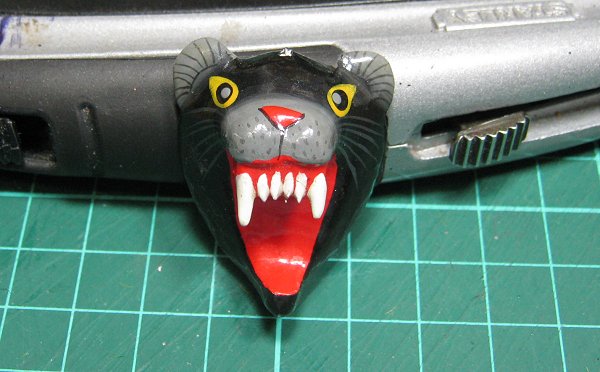
I have one thing to add after it's painted. I bought this wooden hand-painted panther head at the same time I that bought the little figures I've used above. I'm going to mount it above the door where it will deter burglars and other unsavoury types.
|